Followers

Showing posts with label Kleancolor. Show all posts

Wednesday, January 15, 2014

Chocolate Swirl Water Marbling

Hello dear readers!

For my 2nd nail art of 2014, I chose water marbling. It is also the 2nd time I try water marbling.

I've always thought that there's a lot of wasted polish when trying it, but then I figured out... with all the nail polishes I have, when am I going to finish a bottle? I might as well put my nail polishes to good use and have fun with it...
For this mani I wanted a combination of powder pink and different shades of brown. Here's what I came up with:
  (More details and pics below)
 Now that I see it, it reminds me a little bit of a cake with swirled chocolate icing...yummy!

For this manicure, I started with Orly - Prelude to a Kiss as the base.

Then I added a drops of :
Finger Paints - Sketchy Character
Milani - Bare with me
Kleancolor - Cappuccino
Nicole by OPI  - Hard-kourt Fashionista

Is a little bit hard to swirl the nail polish around.
I know there's a learning curve to it; maybe I need more practice.

I really like how the pattern came out on my thumb :D

Have your tried water marbling? Has it been easy for you?

♥♥Thank you for reading♥♥


Thursday, July 25, 2013

Black Lace and French Manicure and How to

Hello dear readers:

The nail art I'm posting today is a remake of something I already did once before I started this nail blog. It is a combination of French manicure and lace. Details on how I did it below:


I started with one layer of basecoat. Using Kleancolor in black, I painted French tips using the nail polish brush. I didn't use adhesive guides this time. I think it looks better if I use my natural nail smile lines as my guide.

I stamped on top of the nail bed area with a lace pattern from A40 stamping plate using Kleancolor black as the stamping polish. I wanted to give this manicure a bit more glam so I added one layer of a glitter nail polish on top of the French tip.

What do you think of the combination of lace and French manicure?

♥♥Thank you so much for reading♥♥

Thursday, July 18, 2013

Holographic Skittle Manicure and Stamping

Hello dear readers!

This is my first post after my painful thumbnail breakage... as you can see, I managed to keep some length.

It's been months since I purchased my Color Club Halo Hues collection and still they were sitting unused in a dark corner of my nail polish drawer. This time I thought it was a good idea to put 5 of them to good use and do a skittle manicure.
 

The Color Club colors that I used are as pictured on the pic below from left to right:
 Cosmic Fate, Over the Moon, Kismet, Eternal Beauty, and Angel Kiss

I stamped a pattern from my Bunny Nails HD-A plate using Kleancolor black.

Both of my hands, can you believe I took this pic myself? :-)

What do you think of my attempt on the skittle manicure?
♥♥Thank you so much for reading♥♥

Sunday, December 23, 2012

Lovely Christmas Nail Art

Christmas is around the corner and I would like to show you the nail art that I will be wearing this time.

I called it Lovely Christmas because of the snowflakes... If you look closely, the bigger ones have hearts on them. Those snow flakes looks like a hybrid of Valentines and Christmas. I also thought that using red as the base would be a perfect match for the heart-snowflakes.

(Pictures can be enlarged)

For this nail art, I applied french tip guides on the moons of my nails and painted my nails red using Color Club Red - Velvet to give a half moon manicure. After that, I applied nail art stickers with snowflake and heart shapes. I also applied iridescent glitter from Kleancolor - Sugar coat to give an extra sparkle.


I hope you like this nail art as much as I do ;-) I will be posting another Christmas nail art soon.

♥♥Thank you for reading♥♥

Monday, November 19, 2012

Chellenge: Matte Finish Nails

Hello dears!

Yesterday's challenge for FB AIS was using a matte topcoat on my stamping manicure. This is one of the easiest challenges because I could use any design as long as I applied a matte topcoat.
This challenge was a special one because I  noticed lots and lots of great manicures from the other ladies in the group.

Here is what I came up with:

I used 2 coats of a white nail polish a a base.
I stamped a floral design from XL M plate using Kleancolor - Metallic Pink as the stamping polish and finished the manicure with Kleancolor - Maddly Matte topcoat.


What do you think of this manicure?

♥♥Thank you for reading♥♥

Sunday, November 11, 2012

Challenge: Let my Boyfriend Choose a Design

Hello Dears!

Today's challege for FB, group Adventures in Stamping consists in letting your boyfriend or husband choose a design. I asked my boyfriend over the phone if he could help me with this challenge. More details below:

(Pictures can be enlarged)

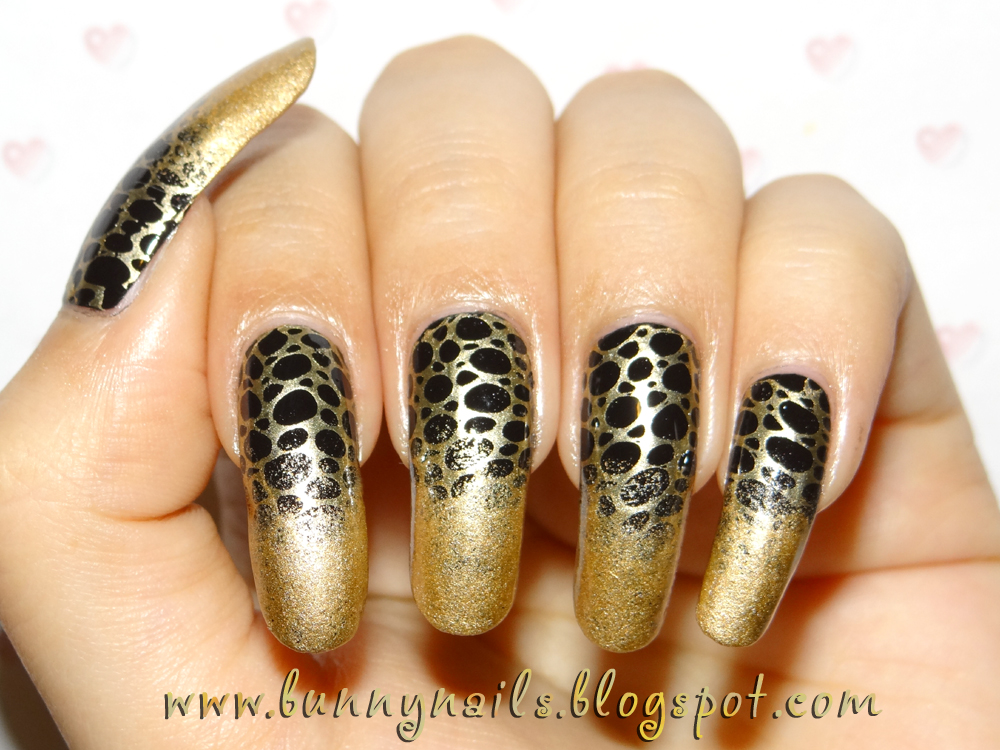
His idea was to use a black nail polish as the base and a stamping design that had a bubble-like pattern in gold. To finish up the manicure, he said it would be a good idea to make some type of gradient on the tips in gold too.

I used Kleancolor in black for the base. Then, I stamped the bubble pattern from XL D plate using Maybelline Colorshow in Bold Gold. I used a makeup sponge and sponged the same gold nail polish on the tips of my nails to accomplish the gradient effect.

I loved his idea. I think I will let him suggest me more nail art ideas in a future ;)

Did you like his nail art idea and the result too?

♥♥Thank you for reading♥♥

Wednesday, October 17, 2012

Halloween Pumpkin Nail Art and Tutorial

Hello dear readers!

Today I decided to do a freehand nail art featuring a Halloween design. (Last year's Halloween nail art here)
This time, Halloween pumpkins were my inspiration.

Below you will see step by step pictures and instructions on how I did this nail art.

First, I painted my nails using a dark purple nail polish. I used Orly's Fowl Play. 

Using an orange color nail polish (or acrylic paint), paint the tip of your nails making semicircular edges at the top of the design. The nail polish I used is Ulta - Sun of a Gun.

With a metallic or glittery nail polish paint the outline of the pumpkin. I used Kleancolor - Metallic Orange.

Now, paint the faces of the pumkins. The facial expressions are up to you ;)

Paint stems and leaves on the top of the pumpkins. I used Kleancolor -  Metallic Green.

This step is optional: you can add any glitter, dots, etc... I painted some candies on the accent nails using to finish the design. I added wrapped candies on the thumb and candy corns on my ring finger nail.

Finished!

I hope you liked this nail art. You still have time do it yourself for this Halloween ;)

♥ ♥Thank you for reading♥ ♥

Monday, October 8, 2012

Challenge: Metallic Madness

Hello dear readers!

This Sunday's challenge for Adventures in Stamping consisted in using stamping with a metallic or chrome finish nail polish.

This time I used my pendant as a stamp plate because the engraving works very well for that purpose :)
I have used this stamp on previous posts, here and here.
 (All pictures can be enlarged)

I used Kleancolor Pearl Fuchsia for stamping on top of a black nail polish base.


Did you like this way of stamping?

♥♥Thank you for reading♥♥

Tuesday, October 2, 2012

Challenge: Using a French Tip Design

Hello again!

Last Sunday's challenge on FB group, Adventures in Stamping was using a french tip design. The cool thing is that I could use a french tip design and stamp it any way I wanted.

This time I decide to do a simple manicure:


I used: Zoya Gigi as the base and stamped designs from Konad m77 plate using Kleancolor Black.
If you would like to know how I stamped the accent nail you can click here.


Did you like this manicure? How would you do it differently?

♥♥Thank you for reading♥♥

Tuesday, July 31, 2012

Red and Black Gradation Nail Art

Hello dear readers!

I  recently joined a FB group called Adventures in Stamping, which focuses on you guessed...nail stamping ;) members can post about nail polish or nail art in general but on Sundays there are stamping challenges and we have to do a stamping nail art based on the theme that members voted on.
For July 29th, the challenge was Red and Black.
This is what I came up with:
(pictures can be enlarged)
I used Rimmel - Passion as the base color. I sponged a gradation of Kleancolor Black and Red nail polishes using a makeup sponge, making sure the gradation looked a bit diagonal. I stamped floral and butterfly designs from plates A25, A43, A58, m20, m82, XL H, and XL K. I also added a tiny bit of silver holographic glitter.


Did you like this nail art? What other color combinations would you like me to use with this centered gradation?

♥Thank you for reading♥


Thursday, May 31, 2012

Romantic Sakura

Hello! I'm finally back!

This time, I'm posting my nail art from the beginning of May. I called it Romantic Sakura because I was inspired by cherry blossoms, a gift of nature so sublime and romantic.

Here is what I did for this nail art:
I started with Orly's Prelude to a Kiss as the base, then stamped the branches from  plate QA21 using Kleancolor Dark Brown. Then, stamped kanji from plate QA7 using Kleancolor Pearl Fuchsia. I used fauxnad S9 to stamp the girl with kimono using Kleancolor Black and and stamped the clouds from QA21 using Konad white stamping polish. After that, I stamped a lacy design below the girl using plate A58 and Kleancolor Pearl Fuchsia as the stamping polish. To finish the look, I added cherry blossoms and butterflies nail stickers. I used Out the Door Fast Dry top coat to add shine and protect my nail art.


Did you like this nail art?

♥Thank you for reading♥

Tuesday, April 10, 2012

Love Birds

Hello again dear readers!

I want to show you this stamping nail art which I called "love birds"


I used the recently famous "Cinderella" by Sinful Colors. This is such a pretty color. My boyfriend bought me this nail polish, which is very rare for him to do. I suppose he is the source of inspiration for this nail art ♥

The idea for this nail art was that these two lovers have obstacles that keep them from being together....

In the end, love triumphs and they can finally meet.

For this manicure, I used Sinful Colors - Cinderella as a base. I stamped the birds from Q1 Konad stamp plate. I used the swirl and flower designs from A series plates A42 and A57. I stamped the LOVE lettering using Essence stampy plate. I used Kleancolor - Metallic Aqua as the stamping nail polish.

I hope you liked this manicure.

Thank you for reading♥

Monday, April 9, 2012

Hello Short Nails!

Hello Dear Readers!

I want to show you how I finally cut my long nails a couple of weeks ago.


Well, my nails are not too short but still is drastic change.

This is the reason why I had to cut them... I have two serious split nails down to the nail bed. I thought that if I leave my nails long like these, I would really hurt my nails one day...

My nails will grow up long eventually, for now I will enjoy my shorties : )

This is the first manicure I did adter I cut my nails.
I used Kleancolor - Holo Chrome as the base.I painted the half moon design and stamped a puzzle pattern from XL A plate using China Glaze - Millenium. Sorry about this crappy picture. This design was really hard to capture.

Tuesday, April 3, 2012

Silver and Gold Meteor Shower Nail Art

Hello!

I want to show you some more "Meteor Shower" nail art I did on two sets of false nails.
Click here for the tutorial if you would like to see how I did this on my natural nails.

Here is the silver version:
More details below.
 (Pictures can be enlarged)
  For the silver meteor shower I used:
-1 coat of China Glaze "Millenium"
-Nabi Crackle nail polish in "Black"
-Love & Beauty holographic glitter top coat.
-Various shapes of silver glitter.

Here is the gold version:
 For the gold meteor shower I used:
-Kleancolor "Metallic Yellow"
-Nabi Crackle nail polish in "Black"
-No brand - gold holographic glitter top coat.
-Various shapes of gold glitter.

What do you think about this nail art? Which one was your favorite silver or gold?
♥Thank you for reading♥

Thursday, February 9, 2012

Pastel Jelly Glitter Franken

Hello dear readers!

Today I want to show you a franken I made a couple of days ago. This franken is a type of sheer color with multi glitter, I called it pastel jelly because it is not very opaque, so that the glitter can be visible. As was cleaning an empty bottle of black Kleancolor nail polish, it occurred to me that I should make a franken from scratch.

I used a bunch of glitters that were sitting in a dark corner of my nail polish drawer and mixed them together.

Here you can see my special blend of glitters...

I mixed the glitters with clear nail polish plus a few drops of white and pink cream nail polish until I reach the desired opacity.

I painted three coats of my pastel jelly & glitter franken.

An extra pic...

I love how this nail polish looks. It reminds me of strawberry glaze with candy sprinkles.
This picture can be found here

I hope you liked this franken because I do :)

Have you tried to mix this type of franken?

Wait! If you like, you can still enter my giveaway it ends in 8 days, February 17th ;)
Related Posts Plugin for WordPress, Blogger...