Followers

Showing posts with label konad. Show all posts

Wednesday, August 28, 2013

Challenge: Stamping Over a Nude Base

Hello dear readers!

Last Sunday's challenge on FB group Adventures in Stamping was to do some stamping nail art on a nude base. I find this group very fun because it stimulates my creativity when I have no inspiration.

Well, here's what I came up with:
More details below....

The base color for this nail art was Palm Springs by American Apparel. Then I did some sponging using other lighter and darker nude tones to give more dimension to the background of my design.

For stamping polishes, I used:
-Sally Hansen Insta-Dri - Mint Sprint (leaves and foliage)
-Sally Hansen Insta-Dri - Presto Pink (Flowers)
-Sally Hansen Insta-Dri - Snappy Sorbet (Flowers on thumb)
-Pop Beauty - Thirty Seven Foggy (Light grey foliage)
-Nabi - Black (Feathers)
For designs, I used:
-XL R plate (Bird on thumb, flowers, big feathers)
-XL F plate (Small flowers, leaves on thumb)
-XL M plate (Big flowers and foliage on ring finger)
-QA23 (Vines on thumb and pinkie)
-A49 (Flowers and leaves on  index)
-m77 (Small feathers and flowers on pinkie)


Here's a detailed picture of what I did on my thumbnail using the stamping decal technique
*I will do a tutorial on this next week

 What do you think of this nail art?
Stay tuned for my tutorial on how to do a nail decal using a stamping design next Monday ;)

♥♥Thank you so much for reading♥♥

Monday, August 12, 2013

Nail Art Remake: Ice Cream and Candy Nails & Tutorial

Hello dear readers!

This time I decided to do an improved version of a nail art from last year (see it here).

The nail art you see now was what I had in mind originally, but 1yr. ago, I was either too busy or too lazy to do all the steps...
(Tutorial for this nail art below)

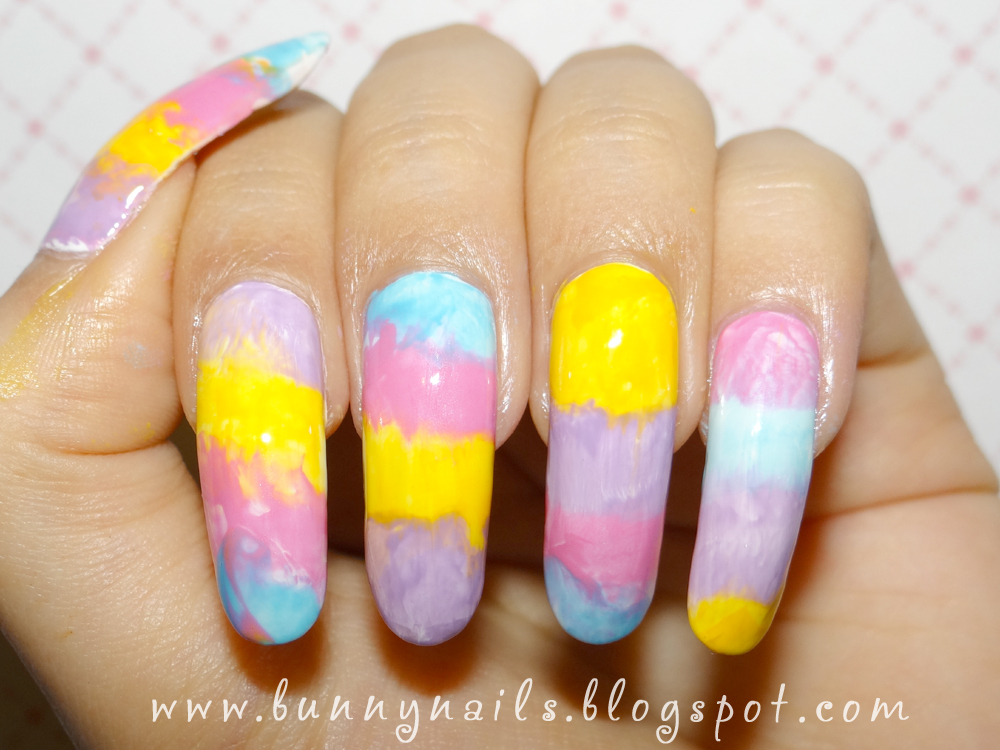
1.Once your nails are prepped with a basecoat, start by applying 1 or 2 layers of white nail polish. 
This is only the base for the pastel colors to look nice & bright.
 

2. Apply lines or dots of different pastel colors onto waxed paper, plastic or aluminum foil.

3.Using a nail stamper press it on top of the nail colors, twisting slightly so that the colors mix up a little bit. You will see the colors transferring to the stamper and ready to apply on your nails.
*You can also paint the pastel color lines directly on your nails with your nail polish brush, whichever is easier for you.

4. Stamp the colors from the stamper onto each nail.(Or paint each color with a nail polish brush). Let it dry.
Don't worry if it doesn't look perfect, it doesn't have to be ;)
My nails look like Easter eggs :D

5. Apply one coat of white crackle nail polish and let it dry to get the cracking effect. Apply clear topcoat to smooth out the nail surface and let dry.

6. I used Konad's Q1 stamping plate and stamped the candy designs on my nails using Kleancolor black. You can use any other stamp plate design of your choice.
*There are other options for this nail art such as applying nail art stickers or by drawing freehand designs on your nails ;)

I hope you like this nail art tutorial and that it can be useful to you ;)


Which version do you like better? Last year's or this one?
♥♥Thank you so much for reading♥♥
Monday, October 29, 2012

Challenge: Using a plate with the # of the day you were born

Hello dear readers!

Oct. 28 Challenge manicure for FB group Adventures in Stamping was using a stamping plate with the number of the day you were born. In this case, I used A series stamp plate A25.

 (Pictures can be enlarged)


I used China Glaze -  Sunset Sail as the base color and a reddish brown stamping polish from Konad.
 
I really like this color combination, it gives this manicure a romantic, vintage look.
In a previous post, I've used the same color combination, you can take a look here.
I showed this manicure to my friend and she said it was perfect for Valentines Day...I should have waited  until then to do this manicure...

What do you think of this manicure? I hope you like it :)

♥ ♥Thank you for reading♥ ♥

Tuesday, October 2, 2012

Challenge: Using a French Tip Design

Hello again!

Last Sunday's challenge on FB group, Adventures in Stamping was using a french tip design. The cool thing is that I could use a french tip design and stamp it any way I wanted.

This time I decide to do a simple manicure:


I used: Zoya Gigi as the base and stamped designs from Konad m77 plate using Kleancolor Black.
If you would like to know how I stamped the accent nail you can click here.


Did you like this manicure? How would you do it differently?

♥♥Thank you for reading♥♥

Wednesday, July 18, 2012

Ice Cream & Candy Nails

Hello dear readers!

I would like to show you my stamping manicure using the full-nail design from Q1 plate from Konad that I bought last Christmas .

This is the second time I use this lovely plate. This is what I came up with this time:
I started with white nail polish as a base. For the colors, I dabbed dots of pastel color nail polishes onto a makeup sponge and pressed the sponge on my nails to get this effect. I stamped the Q1 full nail candy design using Kleancolor in black and finished with Out the Door quick dry top coat.

An extra pic with outdoor light.

Thank you for reading♥♥♥

Thursday, May 31, 2012

Romantic Sakura

Hello! I'm finally back!

This time, I'm posting my nail art from the beginning of May. I called it Romantic Sakura because I was inspired by cherry blossoms, a gift of nature so sublime and romantic.

Here is what I did for this nail art:
I started with Orly's Prelude to a Kiss as the base, then stamped the branches from  plate QA21 using Kleancolor Dark Brown. Then, stamped kanji from plate QA7 using Kleancolor Pearl Fuchsia. I used fauxnad S9 to stamp the girl with kimono using Kleancolor Black and and stamped the clouds from QA21 using Konad white stamping polish. After that, I stamped a lacy design below the girl using plate A58 and Kleancolor Pearl Fuchsia as the stamping polish. To finish the look, I added cherry blossoms and butterflies nail stickers. I used Out the Door Fast Dry top coat to add shine and protect my nail art.


Did you like this nail art?

♥Thank you for reading♥

Tuesday, April 10, 2012

Love Birds

Hello again dear readers!

I want to show you this stamping nail art which I called "love birds"


I used the recently famous "Cinderella" by Sinful Colors. This is such a pretty color. My boyfriend bought me this nail polish, which is very rare for him to do. I suppose he is the source of inspiration for this nail art ♥

The idea for this nail art was that these two lovers have obstacles that keep them from being together....

In the end, love triumphs and they can finally meet.

For this manicure, I used Sinful Colors - Cinderella as a base. I stamped the birds from Q1 Konad stamp plate. I used the swirl and flower designs from A series plates A42 and A57. I stamped the LOVE lettering using Essence stampy plate. I used Kleancolor - Metallic Aqua as the stamping nail polish.

I hope you liked this manicure.

Thank you for reading♥

Saturday, January 14, 2012

Konad Q1 Charming Nail Stamp Plate

After a long time wanting the Konad's Q1 Charming Nails stamp plate, I finally decided to order this plate on Christmas Eve as a gift for myself ; )

For those who may not know about it, a group of nail stamp lovers decided to get together and design their own stamp plate, it all started back in 2010 and they dedicated a blog for this project, Nail Artist United. It took some time for their dream of having a nail stamp plate created by fans to become a reality and finally, in 2011, Konad UK produced the Q1 Charming Nails plate. You can read all about it here. The plate, Charming Nails, was named after the creator of the designs featured in this plate, you can visit her blog here.

This plate is limited edition and I did not want to wait any longer to own this beautiful stamp plate, who knows for how long it will be available...

 I ordered this plate on Dec. 24 and arrived in January 9, I bought it at Cesarsshop for one plate it was 11  EUR (Now it is 8 EUR1!) including shipping which is roughly 14 USD. The shipping was very affordable, 1 EUR mailed as letter. Overall, I'm very satisfied with their service and the speed of shipping. 
Here is how it arrived, all the way from Finland. The envelope had bubble wrap inside and was very well packaged .

I cannot wait to play with this stamping plate :) Thank you for reading!

Saturday, November 26, 2011

Hello Kitty Nail Stamp Art

Hello Again! 

I want to show you some stamping nail art I did using Hello Kitty nail stamp plate I got for from Bornprettystore. I combined the Hello Kitty design with various Konad stamp plate designs.

On top of the nail I stamped a lace frill design. In the middle of the nail, I stamped the Hello Kitty face. I used the pearl necklace design to stamp the tip of the nails. I stamped feather and little flowers around the HK face to fill empty spaces and make it look fancier.

I'm currently wearing Revlon's Cheers nail polish. I stamped all the designs using Konad's white special nail polish


Here is the nail stamp plate by Bornpretty. You can buy it here. They have giveaways frequently, sometimes you can get it for free, you can click here for more details.


What do you think about this nail art?
If you have any suggestions for nail art you would like me to do, don't be shy and comment here :)

Tuesday, November 8, 2011

Nocturnal Butterflies Nail Stamp Art and Thanks

Hello Dear Readers! Thanks for following my blog. I have 20 readers!!!!!!!!!!! I know that there are many bloggers out there who have hundreds or even thousands of readers, but I am happy there is 20 people out there that read my blogs once in a while. I have somebody to share my nail hobbies with and that is important to me. Thank you very much for reading, followers or occasional readers. I will have a nail stamping plates giveaway very soon so stay tuned, hehe

Today I want to show you the nail art I did yesterday, I called it "Nocturnal Butterflies". I used Konad nail stamping plates m20, m53, m77 and m78. I stamped the different butterflies and flowers using Kleancolor black nail polish on top of NYX Perfect gray nail polish. I painted some black french tips and finished with some glitters.

Thanks so much for reading! Comments are always welcome ;)

Friday, October 7, 2011

This week's nail art

Hello dear readers:

This is the nail art I did on my nails this week. I did a combination of a half moon manicure and stamping.
I used Revlon's "Peach Smoothie" from the scented nail polish collection. I must say I love the color but the formula is very watery and thin. I applied 2-3 coats and had to let dry in between coats, otherwise, the nail polish would leave bubbles. After that, I stamped using Konad plates m20, m26, m36, m39, m53, m78 and magnonails XL C plate Konad special nail polish in brown. I also drew lines aroud the half moon using OPI Suzi Says Da. I finish up with Out the Door fast dry top coat. This top coat did not affect the scent from Revlon nail polish.
Oh, I almost forgot to mention that this nail art was inspired by a nail art displayed in the October 2011 issue of Nail Max magazine, picture from the mag is shown below.

Here are pictures of my nails:

Here is the source of inspiration:

Here, I introduce you to my cat Brisa who was around while I was taking pics. Pretty isn't she? I always say she should be a model for cat food or something hahaha.

What do you think about this nail art?
Thank you for reading.

Monday, August 1, 2011

Konad tutorial - Pink & black lolita nails

Hello. Here is a nail design I made a few days ago. Sometimes I'm too lazy to decorate my nails and since my manicures usually last 2-3 weeks, I decided to show you some nail art using false nails and konad nail stamps. Konad carries assorted designs, some are small and other are full nail patterns. Here, I made a combination of both. I'm going to show you how you can make a design using a combination of small objects.

First, I painted a set of false nails using a light pink color.

Then I decorated the thumb nail by stamping a round lace from Konad plate m77

I used the pearl necklace stamp from the same plate, but while the design was on the stamper, I erased the rest of the design to leave a single chain of pearls. I positioned the pearls under the lace.
I finished the nail by adding a bow from Konad plate m59
I stamped the rest of the nails by using a variation of full nail images and combination of lace and bows.

Here is the final product:
I hope this short tutorial can serve you as an inspiration to make more original nail designs.


Related Posts Plugin for WordPress, Blogger...