Followers

Tuesday, December 31, 2013

2 Types of New Year Nail Art for 2014

Hello dear readers!

Today I'm showing you 2 different types of new year nail art.
On the last 2 years, I usually do one nail art based on the Chinese New Yr and its zodiac. I did the yr of the dragon in 2012 and the yr of the snake in 2013. This time, I wanted to mix things a little bit by doing my usual Chinese zodiac-inspired nail art and and another one that represents new year generally.

More details below...

First, I'll show you the year of the horse nail art...

This is by far my favorite theme for new year. I like how you can incorporate the animal in the manicure; this gives endless possibilities for creativity

For this manicure I used Maybelline Colorshow in Sandstorm as the base. I topped it with a 24k gold flake topcoat by Ninja Polish. I painted the numbers and the horse head using Oumaxi acrylic paints. I added flower nail stickers for extra decoration. 

For the thumb, I painted a red square and stamped the Chinese Fú character that means "Happiness" or "good fortune" using QA21 stamp plate. 


 Now, on my 2nd new year nail art I wanted to capture the overall mood of celebration seen worldwide like the fireworks and people getting together to welcome a new year. 

For this nail art I used Revlon Top Speed in Black Star as the base. I stamped fireworks, people, 2014 numbers using designs from HD-E stamping plate.


That's it for my 2014 nail art...

♥♥Thank you to all of you who take their time to leave a comment on each of my posts. If you just prefer to come and read my posts, I thank you as well. You have made a very pleasant 2013 for me♥♥
Now, let's welcome 2014 with new hopes and inspiration!

I wish all of you a very happy new year. I hope 2014 is filled with happiness and prosperity  for all of us ;)

Happy New Year!
¡Feliz año nuevo!
明けましておめでとう!

Wednesday, December 25, 2013

Merry Christmas! Nice and Naughty Nail Art

Hello dear readers!

I hope you enjoyed a wonderful Christmas time with your loved ones.

It's still the 25th here... not too late to post about the manicure I wore yesterday.

I called this manicure "Nice and Naughty" because there are two different Xmas themes going on each hand.
On the left you can see snowflakes with hearts, that's the "nice" theme.
On the right side, you can see an ugly sweater pattern design, but in the middle of the 4 nails, you can see the reindeer getting a little naughty with each other...

See? At least, that was the idea

 I used Christmas plates HD E & F for all the designs on this manicure. The red nail polish is China Glaze - red Satin. In the case of the naughty reindeer, I transferred the designs onto the stamper, covered with clear topcoat, let dry. After that, I applied top coat on my nails and placed the reindeer accordingly. I used the stamp decal technique.

I hope you liked this manicure.

♥♥Thank you so much for reading♥♥

Monday, December 23, 2013

Christmas Snow Bunnies

Hello dear readers!

Today I want to show you really quick another Christmas inspired nail art...

For this nail art I used Lacquer Lust Aquamarine as the base. For my thumbs, index and pinky I stamped a snowflake pattern from HD-F stamping plate. On my middle and ring fingers, I added some crushed glitters in white color, stamped bunnies from plates HDA & B and I added China Glaze - There's Snow one Like you on the tips to give that textured snow effect.

Close up pic...

I hope you liked this nail art
♥♥Thank you so much for reading♥♥

Thursday, December 19, 2013

Nude Nail Polish: Natural by Nabi

Hello dear readers!

Today's post is dedicated to another favorite nude nail polish. Natural by Nabi brand is my go-to nude nail polish for my toes. I rarely wear bright colors there other than nude tones. Maybe I prefer to focus on my finger nails, but that's just me. Anyway, this is a color that I also like use on my finger nails because nude tones are always a favorite of mine.

This is the bottle of Nabi - Natural. As you can see, it is a peachy nude with some beige tone.

Application-wise, this nail polish is very good. No streaks, or dragging. If applied evenly, it can be a one-coater. For the $1 price tag, this can be very impressive. 

 Extra pic of this color.

Not much to say about this color other than it's one of my favotire nude tones together with Palm Springs by American Apparel and Fashion Safari by NYC.

What's your favorite nude tone nail polish?

♥♥Thank you for reading♥♥

Wednesday, December 18, 2013

Video Review of Bunny Nails Holiday Plates HD-E and HD-F

Michelle from Lacquer Or Leave Her! blog has done a video review on my holiday plates HD-E and HD-F. She has done reviews on all my HD plates so far. Michelle has this pleasant voice and enthusiasm on all her video reviews that makes watching them a delight. I'm so glad that she has accepted to collaborate with me on this by dedicating her time and energy to give her honest point of view about my plates.
*Please checkout her video if you are interested to see what my plates are about and a close up look at the designs. And while you are at it, you can also like and subscribe to her YouTube channel ;)
**You can also checkout her new blog post that includes close up pics of the designs, here.

Tuesday, December 17, 2013

Holographic Snowflakes

Hello dear readers!

Here's my first Christmas nail art of the year. For this one, I wanted something a bit subtle, Christmas-y and yet not screaming "Jingle bells, Jingle bells...!" or at least, that was my idea :D

More details and pics below
(All pictures can be enlarged)

I started with Revlon - Black Star as the base. This is a beautiful dark charcoal color, almost black. It also has a touch of shimmer, it's not very visible but it makes the polish a special color. 

Then, I followed by stamping Snow flake designs and patterns from Bunny Nails stamping plates HD E & F. I used Color Club - Harp on it as my stamping polish  because it has a very strong holographic shine. 


Very simple, right? Hopefully, I will make more elaborated xmas nail art on my upcoming posts ;)

♥♥Thank you for reading♥♥

Wednesday, December 4, 2013

Polished by KPT - Blood as Thick as Gold

Hello dear readers!

I want to show you some pictures with this beautiful nail polish called: Blood as Thick as Gold.
I've seen some swatches on Instagram and I was in awe... the combination of oxblood red and mica gold flakes is just gorgeous. Also, I am a big fan of thermal nail polishes. I think the effect is very fun to have on nails.

As you can see, here is the nail polish showing the temperature change. The free edge is usually colder than the nail bed, so, with the right temperature conditions, you can have an effort-less gradient effect.

Here you can see the cold effect. I love how the gold mica flakies shine through the red color.

Here is the warm effect... but I took a pic halfway through it. My temperature was so cold, that I couldn't take a proper picture of it. I must say I would really like a nail polish color like this, a peachy nude tone with gold flakies.

Here is a closeup pic. Overall, application of this nail polish was fairly easy. I think the consistency was a bit thick (probably due to the flakes), but a few drops of nail polish thinner always do the trick.

What do you think about the colors of this nail polish?
♥♥Thank you so much for reading♥♥

Thursday, November 21, 2013

New: HD and BuNa Stamping Plates

Hello dear readers:

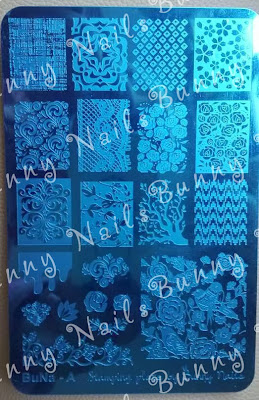
If you are stamping plate fanatic like me and you have tried my previous HD A-D plates, then I hope you all will be excited to know that I just released HD plates E & F which features mostly Christmas designs and a few for Thanksgiving and New Year. Also, I'm thrilled to show you my new stamping plate series BuNa. BuNa plates A & B feature non-holiday related designs. Perfect for your everyday nail art needs ;)

Without further ado,here are the images and pictures of these 4 new plates:
(Scroll down for details and ordering info)

(All pictures can be enlarged)
BuNa A & B
 HD E & F

Plates are available for purchase now
*Please note this is a pre-order. I am expecting to get the plate shipment on my hands by Nov. 29th and I will start packaging and shipping your orders by then.
You can purchase through my online store: www.bunnynails.ecrater.com or directly through this link: http://bunnynails.ecrater.com/c/1638963/hd-and-buna-series-nail-stamp
The price for each plate is 17.99 USD and free worldwide shipping on these plates.
The size of the plates is 14.5cmx9.5cm and the full nail patterns measure 2.5cmx2cm. All patterns and designs are sized to fit on both, short or long nails.


♥♥Thank you for reading♥♥

Thursday, November 14, 2013

China Glaze - When Stars Collide

Hello dear readers!

Today, I'm going to show you swatches of China Glaze - When Stars Collide. I wore this color last month but couldn't post it because I wanted to post Halloween manicures... so here it is.

 When Stars Collide is a maroon color holographic nail polish. It was part of the China Glaze Hologlam collection.

Here you can see the holographic shine. The holo effect is not as strong as on previous collections but I like the subtle metallic finish.

I experienced a bit of difficulty in application such as bald spots and dragging when I applied a 2nd coat. Not too bad but still, not a perfect application.
Here I posted swatches for CG Strap on your Moonboots, another nail polish from the hologlam collection.

What do you think of this nail polish?
♥♥Thank you for reading♥♥

Saturday, November 2, 2013

2x1 Día de Muertos Nail Art

Hello dear readers!

Today I will be showing you two different Día de muertos (Day of the dead) nail art in the same post ;)
I wanted to try a more traditional one and a simpler one, but with a similar theme.

More detailed pictures and details below....

As I wrote on my día de muertos post from last year, Nov. 1st (children) and Nov. 2nd (adults) are days for Mexicans to remember our loved ones who are no longer with us. We prepare an altar with elements such as fruits, food, and other elements that are supposed to guide the spirit of our loved one to us and then back to the afterlife.
(A  traditional día de muertos altar)

Now, this theme translated to nail art...

*I added the dead lovers as the center of this nail art as a symbol of love after death. 
Absence does not mean forgetting.
There will always be a very special place in our hearts for those who have gone before us.

For this manicure, I started with China Glaze - Howl you Doin' as the base. Then, I stamped the lover's skeletons, papel picado (cut paper) pattern, crosses and candles from HD C and HD D plates.
I painted the skeletons using the stamping decal technique.
On my thumb, I applied a combination of stamping sugar skulls and added flower stickers for extra decoration.
*In Mexico, calaveras de azúcar (sugar skulls) are given as a treat for this celebration or as part of the altar. When given to a friend or relative, the name of the receiver is usually written on the skulls forehead. 

Now, the 2nd nail art theme is death as part of life itself.
It is a fact that many people don't like to think about because it may sound gruesome or sad.
The day we are born, we have started a journey that will finish with death.

A part of a dancing skeleton stamped on my nail...
The skeleton is probably mocking us, saying "Cómo me ves, te verás"
(The way you see me now, sooner or later you will look like me).
 ----------------------------------

I hope you liked any of these two nail art that I made for this very special post.
I had to take some time to write something meaningful for this day because this festivity is very close to my heart. So, if you took your time to read through this post, I hope you've learned a little bit about día de muertos.

♥♥Thank you for reading♥♥


Thursday, October 31, 2013

Halloween Night

Hello dear readers!

This is my last Halloween nail art of the year. I did 4 different manicures in total which is an improvement because I usually only did 1 manicure on previous years. This manicure is originally my bf's idea. He wanted to do all the nail polishing and stamping himself but then got frustrated by my huge nail polish stash. From what he told me about his idea, this is what I came up with:

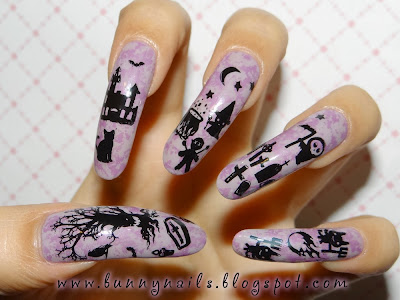
I started with LVX nail polish in Legendaire as the base. I stamped a grunge splatter pattern from HD-C plate using Sally Hansen Insta-dri in Lively Lilac. I stamped all the small designs using HD C and D plates including a tree design from last year's collection.

I used Nabi in black for stamping. on some designs I used the decal technique to do a reverse stamping. 

Here's the stamping on my thumb.

I hope you liked this nail art ;)
♥♥Thank you for reading♥♥

Happy Halloween!


Monday, October 28, 2013

Halloween Nail Art: Zombie Mayhem

Hello dear readers!

I'm trying to come up with more Halloween nail art... I think the idea of doing one on each hand has helped me accomplish  that...

This time, I bring to you a zombie inspired manicure...

(All pictures can be enlarged)
For this nail art, I started with Sun Kissed by Cameo Colours as the base. It is a thermal nail polish which is orange-beige when cold and lime green when temperature turns warm... perfect zombie color combination.
I used  Halloween stamping plates HD C and D for the designs.
Here's what I did on the thumb, blood splatter as the background and a bunch of zombie hands.
I used Sally Hansen Insta-dri in Cinna-snap as the stamping polish for all the blood you see on this manicure.
This is how the manicure looks under cold temperature. The eyes, brains and axe were stamped using the decal technique.
Here you can see the eyes and brains in more detail.

Here are some of the stamping decals that I used on my nails.

What do you think of this manicure? 
♥♥Thank you for reading♥♥


Friday, October 18, 2013

Cute Ghosts and Pumpkins Halloween Nail Stamping

Hello dear readers!

I'm trying to make Halloween manicures as much as I can to give you some nail art ideas. I usually keep my nail art for 2 weeks, which is a long time. This is the reason I decided to do a different nail art for my left and right hand. On my left hand, I did the skeleton mani I showed you last post. Now, on my right hand, I wanted something more cute.

I think this is the1st time I ever show my right hand since I always use it for taking pictures :D
(All pictures can be enlarged)

For this manicure, I started with Revlon Enthrall as the base. and I stamped holographic nail polish on my nails to give a touch of shimmer and dimension to the nail art. I used my HD-C plate for the cute ghosts, candies and "Trick or Treat" lettering. For the spiky vines and pumpkins, I used the HD-D plate
I used Sally Hansen Insta-Dri nail polishes: Brisk Blue, Lickety-split Lime, Lightening, Lively Lilac, Mint Sprint, Presto Pink and Snappy Sorbet for stamping as well as Konad White for the ghosts.

Here are my hands with both Halloween manicures

And here is my right thumb with the stamped holographic spiderwebs

What do you think of this Halloween manicure? 
Is it a good idea to wear 2 different manicures at the same time? :D

♥♥Thank you for reading♥♥
Related Posts Plugin for WordPress, Blogger...