Followers

Monday, March 26, 2012

Meteor Shower Nail Art Tutorial

Hello again!

Today I want to show you a very simple nail art that I called "Meteor Shower" for the insane (in a good way, of course) amount of glitters that I put on my nails. This is also a tutorial because you will see all the steps for this nail art look.

 Pictures can be enlarged

1. Paint your nails with a metallic/chrome or holographic silver or gold nail polish.
In this case, I used China Glaze GR8 from the OMG collection.

2. Apply a black crackle nail polish and let it dry.

3. Apply a clear top coat that is not fast dry, this is important for the next step.

4. Use chunky glitters in gold or silver color, the more variety the better.
As you can see, I have big hexagon, circle, star, hollow star and small hexagon glitters.

5. While the clear top coat is still wet, apply the glitters randomly or in order and add the quantity you like. 
I always start with the big hexagons then apply the stars and circle glitter and finish with the small hexagon glitter.

6. Apply the glitters to all of your nails.
(Can you see the glittery mess in the background of the picture?)

7. Apply 1-2 layers of  clear topcoat to make sure the texture is not rough.
I applied a coat of Gelous topcoat, let it dry a little bit and added Out the Door fast dry topcoat
(any thick consistency clear topcoat + a fast dry topcoat will do the trick)

Anecdote: The day after I did this nail art I went shopping and I saw a mom and daughter whispering to each other and looking at me. I thought they were saying something bad about me, so I walked away from them. Then, the mom stopped me and asked "Who did your nails?" I said "I did them" She was very surprised when I said that these were my natural nails. Maybe she thought that I was wearing acrylics? Is that good or bad? :)

What do you think about this nail art?

Thank you so much for reading! Your comments are always welcome  ♥

Sunday, March 25, 2012

China Glaze GR8

Hello dear readers!

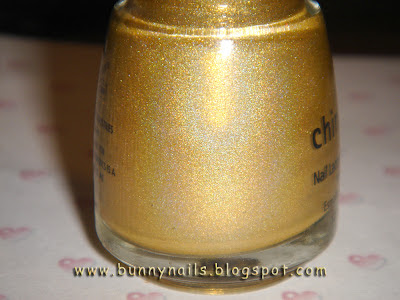
Here is a swatch from 1 week ago, this time wearing a holographic nail polish -China Glaze GR8 from the OMG collection. That is the only CG OMG that I could find in stores and I had to buy the last two bottles as a back up.

Seems like a holo makes long nails look longer and flashier ;)
(Pictures can be enlarged)


This is a close up picture from the bottle. The holographic effect is gorgeous.

An extra pic :)

As of today, I have cut my nails short :(
My next post will feature a nail art tutorial and it will be the last with long nails...until they grow up again :)

Monday, March 12, 2012

Bornprettystore - Color Changing Mood Nail Polish

Hello dear readers!

Today I want to show you a color changing nail polish from Born Pretty. It is the first nail polish of this kind that I own.

This is not a gradient manicure, I am just wearing this nail polish. I think the effect is very cool :)
I chose this particular nail polish color because Grey and pink is one of my favorite color combinations

 The brand of this nail polish is Ylin and the nail color is #14 you can find it here.
When I saw the bottle, the color looked like a muddy gray color but once I put it on my nails, it was pure magic.

At first, it looks grey with a touch of purple...

Once the nail polish adapts to the body temperature, it starts changing colors. Here you see a french or gradient-like manicure effect because my nails beds are the same temperature as the rest of my body and the tips of my nails are grey because of the cooler temperature of being further from my nail beds.

Once the temperature is higher, the nails turn light pink.

As I said earlier in this post, this is the first time I wear a mood nail polish and I like it. Most of the time I get to have the gradient french effect because the weather is getting warmer. I was looking at my nails the whole time to see what color the nails changed to.

You can find this nail polish and other color combinations here at Born Pretty Store. You can get it  with free shipping and use my 10% off coupon DULCEW21

*This nail polish was sent to me for review purposes, however this does not influence my point of view. I have written my honest opinion about this product.

Thank you for reading!

Sunday, March 11, 2012

Sending Out Giveaway Packages

Hello.
Last week was very hectic for me. I had lots of studying, homework and tests to do. I also shipped out the giveaway packages.

Here are some of the packages I shipped to the winners. I sent packages to so many different countries besides the US: England, Italy, Philippines, Portugal, Romania, Serbia, South Korea, and Sweden.
I was nervous going to the post office with so many packages and thinking that other customers waiting in line would be upset that they had to wait a bit longer. If you could see the sales ticket, it is very looooong :)
I never spent so much on shipping but I forgot about it thinking that once the packages were received by each of the winners, they would be very happy.

Thank you for reading :)
Related Posts Plugin for WordPress, Blogger...