Followers

Thursday, October 31, 2013

Halloween Night

Hello dear readers!

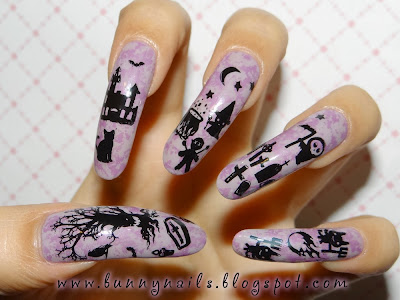
This is my last Halloween nail art of the year. I did 4 different manicures in total which is an improvement because I usually only did 1 manicure on previous years. This manicure is originally my bf's idea. He wanted to do all the nail polishing and stamping himself but then got frustrated by my huge nail polish stash. From what he told me about his idea, this is what I came up with:

I started with LVX nail polish in Legendaire as the base. I stamped a grunge splatter pattern from HD-C plate using Sally Hansen Insta-dri in Lively Lilac. I stamped all the small designs using HD C and D plates including a tree design from last year's collection.

I used Nabi in black for stamping. on some designs I used the decal technique to do a reverse stamping. 

Here's the stamping on my thumb.

I hope you liked this nail art ;)
♥♥Thank you for reading♥♥

Happy Halloween!


Monday, October 28, 2013

Halloween Nail Art: Zombie Mayhem

Hello dear readers!

I'm trying to come up with more Halloween nail art... I think the idea of doing one on each hand has helped me accomplish  that...

This time, I bring to you a zombie inspired manicure...

(All pictures can be enlarged)
For this nail art, I started with Sun Kissed by Cameo Colours as the base. It is a thermal nail polish which is orange-beige when cold and lime green when temperature turns warm... perfect zombie color combination.
I used  Halloween stamping plates HD C and D for the designs.
Here's what I did on the thumb, blood splatter as the background and a bunch of zombie hands.
I used Sally Hansen Insta-dri in Cinna-snap as the stamping polish for all the blood you see on this manicure.
This is how the manicure looks under cold temperature. The eyes, brains and axe were stamped using the decal technique.
Here you can see the eyes and brains in more detail.

Here are some of the stamping decals that I used on my nails.

What do you think of this manicure? 
♥♥Thank you for reading♥♥


Friday, October 18, 2013

Cute Ghosts and Pumpkins Halloween Nail Stamping

Hello dear readers!

I'm trying to make Halloween manicures as much as I can to give you some nail art ideas. I usually keep my nail art for 2 weeks, which is a long time. This is the reason I decided to do a different nail art for my left and right hand. On my left hand, I did the skeleton mani I showed you last post. Now, on my right hand, I wanted something more cute.

I think this is the1st time I ever show my right hand since I always use it for taking pictures :D
(All pictures can be enlarged)

For this manicure, I started with Revlon Enthrall as the base. and I stamped holographic nail polish on my nails to give a touch of shimmer and dimension to the nail art. I used my HD-C plate for the cute ghosts, candies and "Trick or Treat" lettering. For the spiky vines and pumpkins, I used the HD-D plate
I used Sally Hansen Insta-Dri nail polishes: Brisk Blue, Lickety-split Lime, Lightening, Lively Lilac, Mint Sprint, Presto Pink and Snappy Sorbet for stamping as well as Konad White for the ghosts.

Here are my hands with both Halloween manicures

And here is my right thumb with the stamped holographic spiderwebs

What do you think of this Halloween manicure? 
Is it a good idea to wear 2 different manicures at the same time? :D

♥♥Thank you for reading♥♥

Thursday, October 17, 2013

Halloween Skeleton Nail Stamping

Hello, dear readers!

As you may have read on my previous post. I released new HD stamping plates with Halloween and Día de muertos designs. Now that they are on my hands, I put HD-C plate to the test and did a manicure with it.


(All pictures can be enlarged)

I started out by using Revlon - Enthrall as the base for this manicure.

I stamped the spiderweb pattern on the thumb using a holographic stamping nail polish that I made myself with Spectraflair pigment. On the other nails, the spiderwebs look more subtle because I used a holographic topcoat instead to give a hint of shimmery spiderwebs. I stamped the dancing skeleton image with Sally Hansen - Silver Sweep. I used the stamping decal technique to have more control of the placement of the design across my 4 nails. I just transferred the design onto the stamper, added clear topcoat, let dry and cut/applied the skeleton in parts.

A close-up pic on the spiderweb design on my thumb nail.
(Can you see the holographic effect?)

What do you think of this manicure?
(You can purchase HD C and D plates here)

♥♥Thank you so much for reading♥♥

Wednesday, October 9, 2013

New HD Nail Stamping Plates: Halloween and Día de Muertos

Hello dear readers!

For nail stamp fanatics out there, here are my new HD plates.
Plates HD-C & HD-D are the continuation of my holiday series, this time, featuring designs for Halloween and Día de muertos.
(Image can be enlarged)
Plates are available and ready to ship now!
You can purchase through my online store: www.bunnynails.ecrater.com or directly through this link: http://bunnynails.ecrater.com/c/1638963/hd-and-buna-series-nail-stamp
The price for each plate is 17.99 USD and free worldwide shipping on these plates.
The size of the plates is 14.5cmx9.5cm and the full nail patterns measure 2.5cmx2cm. All patterns and designs are sized to fit on both, short or long nails. 

***You can also watch this awesome video review of the plates by Lacquer or Leave Her!


 ♥♥Thank you so much for reading♥♥

Monday, October 7, 2013

Forever 21 - Black Glam Sand Lacquer Textured Nail Polish

Hello dear readers!

As I promised on my last post, here are the swatches for Black Glam, one of the textured nail polishes by Forever 21. (Click here to see their entire line of textured nail polishes)

As you can see, Black Glam is not black, but a dark purple with  multi-color microglitter (I can see some copper, yellow, pink,purple and a bit of green) It's a bit hard to distinguish due to the dark base.

(All pictures can be enlarged)

The opacity of this nail polish is good. I only needed 2 coats to get this result.

I really like sandy texture. I own some sand finish nail polish from other brands, but this is the 1st time that I actually try it on my nails. I couldn't stop touching them. :)

Also, the formula was easy to work with. No bald spots or dragging at all.
*I received a question on my previous post about how easy was to remove this type of nail polish.
I think it's just the same as any other glitter nail polish. If you use the cotton and aluminum foil method, it makes this process so much easier ;)
 
What do you think of this nail color?
How about the textured nail polish trend?

♥♥Thank you for reading♥♥
Related Posts Plugin for WordPress, Blogger...