Followers

Friday, December 30, 2011

My Christmas Nails (I know it's late... ^_^' )

Sorry for this late Christmas greeting, I hope you had a wonderful Christmas with your loved ones.

This my Christmas manicure, I did it on the 23rd and I'm still wearing it... I'm too lazy when it comes to changing  nail polish/nail art. 
As you can see, I stamped Christmas patterns and painted a Santa Claus on my thumb nail.
I used nail stamp plates: XL K (not the magnonails, for the index and ring finger) QA 15 & QA 19 (for the middle finger) and XL I (not magnonails for the pinky).


The Santa Claus design was inspired by Mini Nail Blog tutorial
My Santa Claus looks a bit weird because my nails are a little too long...but my 3yr old niece was very happy looking at this nail, I must have done a good job then :)

The other nails were inspired by Christmas themes, for example, the index and ring nail remind me of gift wrap patterns, the pinky nail is a candy cane and the middle finger nail was inspired by those Christmas knit sweaters (picture below).

Not me...just a funny picture I found on Google, it proves my point on the "beloved" Christmas sweater...
Found picture here

My phrase is: "All I got for Christmas is this fugly nail art" hahaha

What did you get this christmas?

Tuesday, December 20, 2011

My First Franken - picture heavy ; )

Hello dear readers!
It is been a couple of weeks since the last time I posted. I was busy with school (final exams, assignments...). Now I'm officially on vacation  since last Friday. I haven't done anything on my nails because I don't feel like it... I've been feeling a bit down since I finish my semester. It is weird, when I'm in school, I want to take some time off and now that I'm on vacation, I miss school : (  I guess I've been studying nonstop so much that I got used to it, hahaha

Today, I want to show you my first franken polish, it is not like the Spectraflair top coat that I just added the pigment to clear polish...This time I mixed a bunch of nail polishes and glitters.
More pictures below:

It all started as an accident, I wanted to add some holographic shine to a Japanese nail polish that I never got to use (my mom did ^_^), but I guess the color was too sheer because it turned out grey in color... I thought I had ruined my precious Japanese nail polish, and the only way to fix it was to add some color to it.

*For this franken polish I used some drops of:
Borghese - Clear
China Glaze - Millennium
Kleancolor - Neon Pink
Kleancolor - Pearl Fuchsia
Kleancolor - Metallic Pink
Sally Hansen - Sweetheart
*Then, I added A few tiny scoops of :
Spectraflair --of course ;)
Fantasy Makers glitter - Glitz (silver holographic)
Squared translucent glitter

I mixed and swatched until I was happy with the opacity and color and here is the result:
This is the bottle, isn't it pretty?

Here you can see the color and glitter in more detail:
 
Here is the nail polish on my nails:
 

This is the nail polish that I'm currently wearing... since almost 3 weeks! I'm surprised that it has not chipped yet, I love it ;)

What do you think of my first real franken? Your comments are always welcome :)

Saturday, November 26, 2011

Hello Kitty Nail Stamp Art

Hello Again! 

I want to show you some stamping nail art I did using Hello Kitty nail stamp plate I got for from Bornprettystore. I combined the Hello Kitty design with various Konad stamp plate designs.

On top of the nail I stamped a lace frill design. In the middle of the nail, I stamped the Hello Kitty face. I used the pearl necklace design to stamp the tip of the nails. I stamped feather and little flowers around the HK face to fill empty spaces and make it look fancier.

I'm currently wearing Revlon's Cheers nail polish. I stamped all the designs using Konad's white special nail polish


Here is the nail stamp plate by Bornpretty. You can buy it here. They have giveaways frequently, sometimes you can get it for free, you can click here for more details.


What do you think about this nail art?
If you have any suggestions for nail art you would like me to do, don't be shy and comment here :)

Revlon Mini Haul & Swatches

Hello dear readers!
I hope that those of you who celebrated Thanksgiving had a great time with your loved ones.

Today, I want to share with you the new Revlon nail polishes I bought from Ulta last week. No black Friday for me...Hopefully, I'll buy something during cyber Monday.

I got three nail polishes, Revlon's Glitz & Glam, Cheers and Grey Suede. Now with some swatches...

Glitz & Glam is silver micro glitter in magenta jelly base. It has a semi matte finish by itself but once you put a clear topcoat, it shows its glitzy shine. This one needs 2 to 3 coats to be opaque.

Now, my favorite: Cheers. It is a cream, dusty pink. Why is this my favorite? I'm really impressed with the formula on this one. It only needs 1 coat. Really. One coat was enough to cover my nails, not streaky at all and no bald spots. And dries very fast.

One more thing I like about Revlon's Cheers is that it is so opaque that it works as a stamping nail polish. Let me show you how it looks stamped on a dark paper:
Very nice for stamping, right?
Comments are always welcome ;)

Wednesday, November 23, 2011

Lace up Nail Tutorial

This nail art has both, a lace pattern and lace up lines. Lace is my favorite theme when it comes to nail art I do on my nails because I think lace gives a romantic and seductive look.
What you will need for this nail art is:
-Nail art striping brush
-Black nail polish or acrylic paint
-Dotting tool or toothpick
-Nail stamp plate with fishnet pattern.

If you don't have nail stamp you can substitute with the striping brush and with a little more patience you can achieve the same look:


Tutorial after the jump...

Tuesday, November 8, 2011

Nocturnal Butterflies Nail Stamp Art and Thanks

Hello Dear Readers! Thanks for following my blog. I have 20 readers!!!!!!!!!!! I know that there are many bloggers out there who have hundreds or even thousands of readers, but I am happy there is 20 people out there that read my blogs once in a while. I have somebody to share my nail hobbies with and that is important to me. Thank you very much for reading, followers or occasional readers. I will have a nail stamping plates giveaway very soon so stay tuned, hehe

Today I want to show you the nail art I did yesterday, I called it "Nocturnal Butterflies". I used Konad nail stamping plates m20, m53, m77 and m78. I stamped the different butterflies and flowers using Kleancolor black nail polish on top of NYX Perfect gray nail polish. I painted some black french tips and finished with some glitters.

Thanks so much for reading! Comments are always welcome ;)

Spectraflair Topcoat

Hello, it's me again. I want to share with you some swatches of different nail colors with a Spectraflair top coat that I frankened myself. 


Here is how the nail colors looked before the topcoat:

And here is the picture of the bottle I used:
The recipe I used for this topcoat: I filled 1/3 of the bottle with suspension base I emptied from a heart glitter nail polish. Then, I filled the rest with Sally Hansen clear topcoat. I put in 4-5 small straw spoonful of Spectraflair powder (you can see a frankening recipe in More Nail Polish blog). Finally, I added  12 drops of nail polish thinner (To mix the Spectraflair better).

What do you think of the holographic effect of this topcoat?

Target beauty bag

Hello dear readers! 
I want to show you the free beauty bag I got from Target. I just received it today. 
People forn the East Coast were receiving them since two to three weeks before. They also seem to get more stuff, nevertheless, I'm happy with the samples I got:
John Frieda Full Repair - shampoo and conditioner
Garnier Fructis Fortifying - shampoo and conditioner
Tresemmé Naturals - shampoo and conditioner
Pond's Wet Cleansing towelettes packet
L'oreal Youth Code Day/Night cream
What I like the most about the Target beauty bag is the beautiful cosmetic bag. It is the second time I get this freebie from Target and the bag is bigger than the last one. Here you can see last spring's beauty bag compared to the recent one:
Both are pretty in design and color and most importantly, I got them for free!

Monday, October 31, 2011

Halloween Nails!

Hello dear readers!

Today I'm showing you the Halloween nail art I did a few hours ago. I had no time to clean my cuticles properly, so they are a bit messy.

This nail art is my version of a design made by Candy nail you can visit her blog, she has pictures of awesome Japanese nail art done by her.
I'm not very skillful when it comes with hand drawn nail art, it took me a good 3hrs to finish all my nails. As you can see, I used different "techniques". For the thumb, I painted a pumpkin and added, flakie nail polish, gold small hexagonal and star glitter. for the index finger, I painted a happy ghost with gold glitter outline, then I painted a pink candy. For the middle finger, I painted a coat of Sally Hansen's "Pumpkin Spice" which is orange glitter suspended on black jelly base. I topped it off with more star and hexagonal glitter. For the ring finger, I painted an angry ghost and the word "Boo" using Sally Hansen "White On". For the pinkie, I painted a coat of Sally Hansen Hidden Treasure and stamped a white spider web using fauxnad XL nail stamp plate J.


What do you think of this nail art?
Happy Halloween!

Monday, October 24, 2011

OPI My Private Jet & Spectraflair

Hello dear readers! I hope you had a great weekend ^ ^

Last week, I got my first gram of the famous spectraflair pigment. TraceFace was kind enough share the info on where to get it and not to keep the secret to herself. So I contacted the seller and she answered very fast. She has two spectraflair grades, 14 and 35 at a very affordable price. I bought 1 gram of grade 35. The day I got it I didn't know what to do with it, it  was sitting in my drawer for a week or so until I decided it to give it a try. I mixed a very small portion to OPI My Private Jet, the non-holographic version and here are the results:


I couldn't be much happier with my new holographic nail polish.

Monday, October 17, 2011

Jordana - Dusty Rose

Hello dear readers!

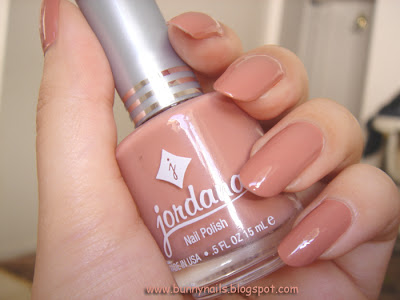
Today I'm showing you pictures of the nail polish that I was wearing yesterday. It is "Dusty Rose" by Jordana. I bought this nail polish last week at a flea market along with a quick dry top coat by the same brand. I love wearing nude or beige tones during fall, so I just had to buy this color to add it to my collection.

I bought this nail polish for $1, so I was not expecting much from it. I must say I'm impressed by the formula. It is a pink beige cream color and applies like a dream, only one coat is enough. Most importantly it is DBP, toluene and formaldehyde free. It is my first nail polish from this brand, so, if all the nail polishes are the same quality as this one, I will try more colors.

Nail Polish Haul

Hello dear readers!

I wanted to go on a nail polish ban for some time, but I just can't resist a nail polish sale (or any other sale ^ ^') so, I took advantage of the Revlon nail polish sales that were going on at Ulta a couple weeks ago and at Walgreens last Saturday (Both had all Revlon 40% off). It was awesome that I was able to get some Revlon's most sought after colors. I also bought some from other brands such as Ulta, Sally Hansen, Maybelline and Jordana. I bought the Jordana nail polishes at my local flea market.


From left to right - Aloof, Girly, Downtown, Catty, Innocent and Carbonite.

Facets of Fuchsia, Starry Pink, Peach Smoothie, Cotton Candy, Gold Coin and Dawn.

Set the Nude, Scene Steel-er, Smoke Screen, White On, Pumpkin Spice, Natural Beauty, Dusty Rose, Quick Dry.

Which nail polishes have you bought recently?

Friday, October 7, 2011

This week's nail art

Hello dear readers:

This is the nail art I did on my nails this week. I did a combination of a half moon manicure and stamping.
I used Revlon's "Peach Smoothie" from the scented nail polish collection. I must say I love the color but the formula is very watery and thin. I applied 2-3 coats and had to let dry in between coats, otherwise, the nail polish would leave bubbles. After that, I stamped using Konad plates m20, m26, m36, m39, m53, m78 and magnonails XL C plate Konad special nail polish in brown. I also drew lines aroud the half moon using OPI Suzi Says Da. I finish up with Out the Door fast dry top coat. This top coat did not affect the scent from Revlon nail polish.
Oh, I almost forgot to mention that this nail art was inspired by a nail art displayed in the October 2011 issue of Nail Max magazine, picture from the mag is shown below.

Here are pictures of my nails:

Here is the source of inspiration:

Here, I introduce you to my cat Brisa who was around while I was taking pics. Pretty isn't she? I always say she should be a model for cat food or something hahaha.

What do you think about this nail art?
Thank you for reading.

Thursday, September 29, 2011

Today's nail art

Hello dear readers!

This is my second post of the week, today I'm showing you some nail art using the "pendant stamp" from previous post . My nails are long enough to decorate my nails now. It took a month to grow them this long. You can see on the previous pendant stamp posts that I used false nails to show you the stamp. But this time I'm using my own nails ;). For this look, I painted a coat of Kleancolor "Neon Aqua", after that, I added two coats a Verity nail polish in "Sky blue glitter" and used Kleancolor "black" for the stamp.


What do you think of this look?
Do not hesitate to comment, I read all my comments and I really appreciate your feedback.

Monday, September 26, 2011

"Rocker Chick " nail art tutorial

It is been many days since I made a post, so I want to make it up by posting a tutorial for a "Rocker Chick" nail art look.

I made the tutorial using a set of false nails, of course you can get the same look on your natural nails. It is easier for me to take pictures at false nails rather than at my own nails by using my right hand to take pictures of my left hand. Pictures always end up blurry 'cause my hands are kind of shaky hahaha :).

Here is the look:

Now with the tutorial...

Tuesday, September 13, 2011

Forever 21 Love & Beauty and L.A. Girl Glitter Addict Dupe Chart

On my previous post, I mentioned that I bought a bunch of Love & Beauty Glitter nail polishes from Forever 21. I bought those nail polishes mainly because I wanted to try L.A. Girl Glitter Addict nail polishes. I noticed that those two are exact duplicates of each other, they even have the same bottle design. So, they are practically the same nail polish with different label and names.

Here you can see they are the same, here they look a little bit different because the position of the bottle and the lighting is different.
For those interested that get to read this post, I made a chart with the images and names of both nail polishes in case, let's say that some nail polish from L.A. Girl Glitter Addict is out of stock, then you can get the same one from F21. I don't know if it is that useful or not, but I made it to keep it as a reference.

*Please note that the names from the Forever 21 nail polishes are based on the ones given at the online store,  the nail polishes bottles will have plain names such as blue, gold, etc...

Click on the image to see it in a bigger size

Big Nail Polish Haul

Hello readers!

As I posted earlier in my first post, I said something about being a nail polish addict, and I'm still one. I wish I could stop but there are many cute colors that keep coming out and I want to have them. It is not my fault. ;)

Well, last week I ordered a bunch of nail polishes from Forever 21 taking advantage of the Labor Day free shipping offer they had. I noticed that they had a line of glitter nail polishes just like the ones from L.A. Girl Glitter Addict line. I can't resist buying glitter polishes so I had to have them. I also bought a few others from them that are not so glittery.
I also went nail polish shopping at two of my local flea markets.
 
Here, all the nail polishes I bought:

From Forever 21:
Names from left to right: Golden Girl, Black Knight, Glitter Magenta, Penny, Shimmering Turquoise, Pink Sparkle.

Names from left to right: Sparkling Red, Sparkling Confetti, Gold Dust, Disco Ball, Shimmering Purple, Glitter Blue, Sparkling Ocean.

Names from left to right: Gold Dust Glitter, Safari, Shimmering Silver.
From flea market: Milani nail polishes ($1 each!)

Names from left to right: Magical, Spellbinding, Mantra, Glitzy Stars, Bare in Mind, Key Lime Shine, Bare to wear.

More NYX Girls nail polishes ($1.50 each):

Names from left to right: Mushroom Glitter, Girly, True Navy, Perfect Gray.

Cherimoya 2012 crackles ($2) and Kleancolor ($1):

Names from left to right: Immortal, Eternity, Pearl Silver, Bridal Shower.

I seriously need to go on a nail polish ban for sometime, I don't not how long I can resist.

Do you have a beauty product addiction that you can not resist buying more? Which one is it?

Thank you for reading!

Related Posts Plugin for WordPress, Blogger...